
Beach Inspired Kitchen Remodel for Under $200
If you read our previous post, 5 Reasons NOT to Quit Your Job to Travel, then you already know we bought a house in San Diego last year and I’ve rekindled my love for crafty projects! However, most of our money goes towards our next adventure, so we’re always reluctant to spend money on material items because it means we have less money for travel.
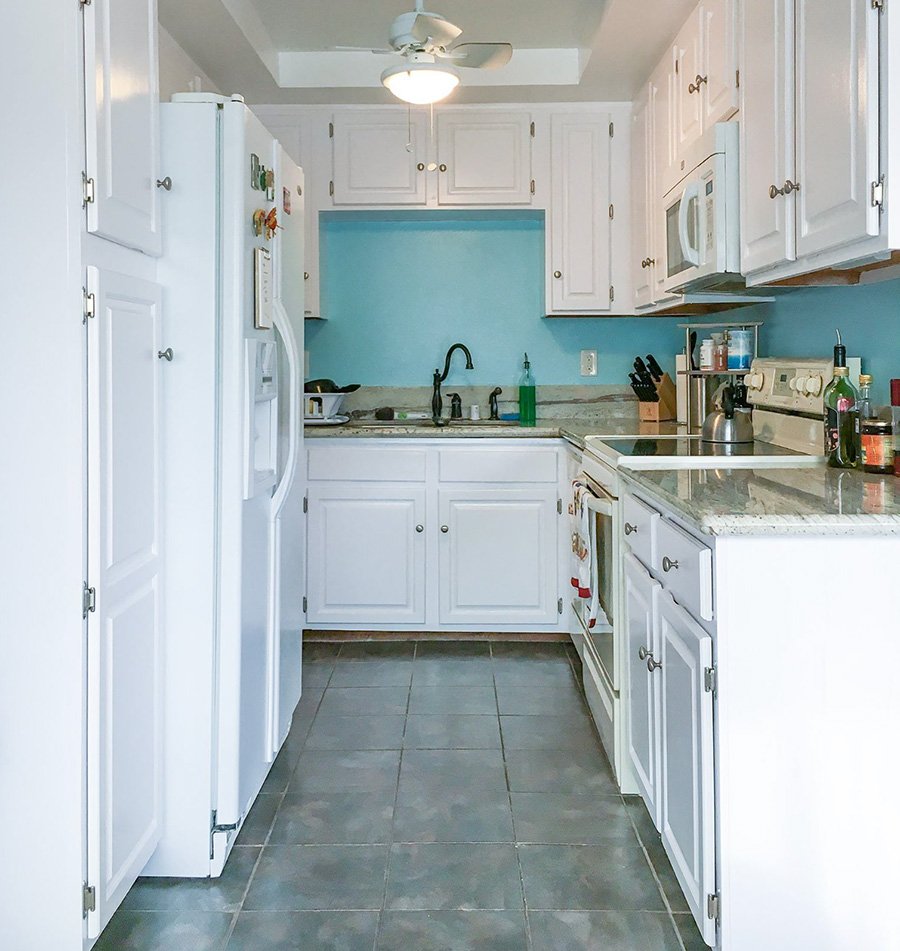
Our goal is to decorate our home with a beach and travel theme, but we don’t want to get carried away by sinking too much money into these projects. From the moment we moved into our new home, we knew we wanted to brighten up our tiny kitchen and since knocking down walls and replacing cabinets would cost several thousand dollars, we decided a fresh coat of paint would be the next best thing.
I’ve always loved bright white kitchens with a pop of color. Going with the beach theme, we knew we wanted an ocean hue for the backsplash, which is why we picked turquoise to accent the white cabinets. With limited lighting and no window in the kitchen, it’s unbelievable how much brighter it feels now!
We took on this project in between several trips overseas and we had to paint our backsplash as well as the ceiling (we HAD to get rid of the awful pink ceiling), so it took us almost a month from start to finish. If you are extremely motivated and have the time, painting kitchen cabinets can be done in about five days — but if you value your sanity and you’re painting backsplash or ceiling walls, I recommend doing it in stages.
Beach Inspired Kitchen Remodel for Under $200

List of Supplies for the Project:
- Plastic Drop Cloth
- Krud Kutter
- Sandpaper or Deglosser
- Rags
- Painter’s Tape (we recommend FrogTape)
- Small Roller & Roller Cover
- Nylon Brush (to get into the grooves)
- Roller Tray
- Stir Stick
- Pouring Spout (this makes life so much easier)
- Painter’s Pyramid Stands
- Stain-Blocking Primer (we used KILZ MAX)
- Paint
- New Hinges and Knobs (if you are not reusing your old ones)
- Mini Razor Scraper (to scrape off old felt pad bumpers)
- New Felt Pad Bumpers
Step 1: Take Down Your Cabinet Doors
Number your cabinet doors with a piece of masking tape and place the same number on the inside of the cabinet so you know exactly where each cabinet will go once you are finished painting. Remove all hardware and place these in Ziplock bags so you don’t lose any small pieces.
Step 2: Empty Cabinets & Cover Cabinet Interiors
We didn’t take everything out of our cabinets, but if you are a very messy painter, you may want to. We only taped off the portion of the cabinets that met the wall. We found that FrogTape for masking and applying pressure with a damp cloth to get a firm grip works best. Every other tape we used bled underneath and we had to clean it up with a Q-tip (so time consuming!).
Step 3: Prepare Your Surfaces
Every DIY painting post will tell you this step is the most important. We did our homework and decided against using TSP (Trisodium Phosphate) to degrease our cabinets before painting because it’s toxic and it could cause your paint to chip if you don’t properly wash off ALL of the TSP.
We used a TSP substitute called Krud Kutter, which worked well and saved us from running the risk of our paint not sticking if we did a poor job of cleaning off the product. If you have dark stain on your cabinets, you may want to use a deglosser — we used this one. We actually found the deglosser worked better than sanding for our dark-stained cabinets. We still did some sanding, but if I were to do it again, I would just use the deglosser. It does the trick!
After you’ve done all of the above, make sure to wipe each cabinet down with a damp cloth and once it’s dry, wipe it again with a tack cloth. This will pick up all of the little dust particles, which is necessary before applying primer.
Step 4: Primer
We used these small pyramid stands and lined up our cabinets along our garage floor. These stands allow you to paint the front of the cabinets before the back side is completely dry.
We found KILZ MAX worked the best for stain blocking unless you go the ultra toxic route. We tried several different primers and the stain either bled through or we thought we were going to die from the inhaling the fumes and decided we didn’t want those toxins in our home.
Step 5: Paint!
Painting is usually the most enjoyable part of this process because you get to see the light at the end of the tunnel and your beautiful new cabinets. We had many hiccups with primer, so we were pretty burnt out at this point, but it was still pretty cool to see all of our hard work paying off.
We used 2 coats of paint on most of our cabinets and waited at least 4 hours in between each coat. Some cabinets required an extra coat or two because the stain was being stubborn and bleeding through. This is why prep work is SO important.
We used an alkyd semi-gloss enamel paint specifically for cabinets because we wanted to be able to easily wipe off dirt. We spent a lot of time at Home Depot, talking with the paint department in order to find the right paint for our cabinets. Chalk paint is very popular right now, but we decided to go with a more glossy look for our cabinets.
Step 6: Install Your Hardware
Our hinges were extremely old and many of them were cracking, so we had to replace them rather than reusing the old ones — but… luckily we were able to use the same silver knobs from our old cabinets. I recommend soaking your old hardware in soap and water to clean them up a bit before putting them on your beautiful new cabinets. We used polish cream to bring back some shine as well.
We had the toughest time finding new hinges for our cabinets! We ended up bringing our old hinges to a cabinet contractor who ordered the correct ones for us, however, we still had to drill new holes into each cabinet door because hinges are so different now than what they were 20 years ago. The good news is that once we got the hang of how to mark and drill the new holes, we were able to finish that up in about two days.
Don’t forget to stick on all of your replacement felt pad bumpers BEFORE you install the new doors, otherwise the doors and drawers will stick to the cabinet boxes and take off your new paint!
Step 7: Put Your Cabinet Doors Back Up – YAY!
We let our cabinets dry for about a week before we put them back up and I’m so glad we did! Paint can take about 21-30 days to cure, so within this time, you have an easier chance of knicking or chipping the paint.
We’ve had our cabinets up for about three months and they still look amazing. If they get a little dirt on them, we can easily clean them up with a wet cloth. I was a little concerned about white cabinets showing dirt, but it’s actually not too bad.
Step 8: Enjoy Your New Kitchen!
Brightening up our kitchen actually inspired me to cook more. We didn’t even add any more lights to this area of our house; the color of the cabinets gave us all the extra light we needed. We found this cute mirror to put behind our sink that looks like a window. Mirrors tend to brighten up small spaces and help bounce light across the room, so it worked out perfect for our tiny kitchen.
Cost Breakdown
Most of our costs went to paint. It took a little less than 2 gallons of primer and 2 gallons of paint for all of our cabinets and drawers. We already had most of our paint supplies such as rollers, brushes, and roller trays, so if you don’t already have these things, keep that in mind when you are budgeting costs. We purchased a few feet of plastic to lay down on our kitchen floor and used newspaper to protect the tops of our kitchen counters.
Paint & Supplies: Approx $125 + New Hinges $68 = Total: $193
As an Amazon Associate I earn from qualifying purchases. I’m also a member of other affiliate programs. For more info please read my Privacy Policy


